
Hello my lovely friends! I'm back again to remind you of DigiStamps4Joy mid-challenge.
This challenge is hosted by the talented Charlene. She challenge the design team and all of you to use three designed papers and three layers. Take a peek at DS4J blog for some inspirations from the design team B.
I have created a lovely keepsake for my little girl who will start pre-school in January 2014. This mini-dresser takes a while to make and lots of patience. I have used a digi image from DS4J entitle See-through Lady. Please click here to purchase her.
 Supplies: DS4J digi image, Kaisercraft English Rose Collection patterned papers/sentiment/brown ink pad, Copic Sketch, cardstocks, cereal boxes
This challenge is hosted by the talented Charlene. She challenge the design team and all of you to use three designed papers and three layers. Take a peek at DS4J blog for some inspirations from the design team B.
I have created a lovely keepsake for my little girl who will start pre-school in January 2014. This mini-dresser takes a while to make and lots of patience. I have used a digi image from DS4J entitle See-through Lady. Please click here to purchase her.


I thank Andrea&Clarissa for their wonderful tutorial. I did a bit of twist according to my preference by adding cut outs from cereal boxes for stability to prolong the life of the drawers and the entire dresser. I have also adjusted the measurement to fit the drawers as I realized that the case of drawers needed extra centimeters for easy release. Thus I decided to make my own version of tutorial so it gives you some ideas how I did it.
HERE's MY HOW-TO

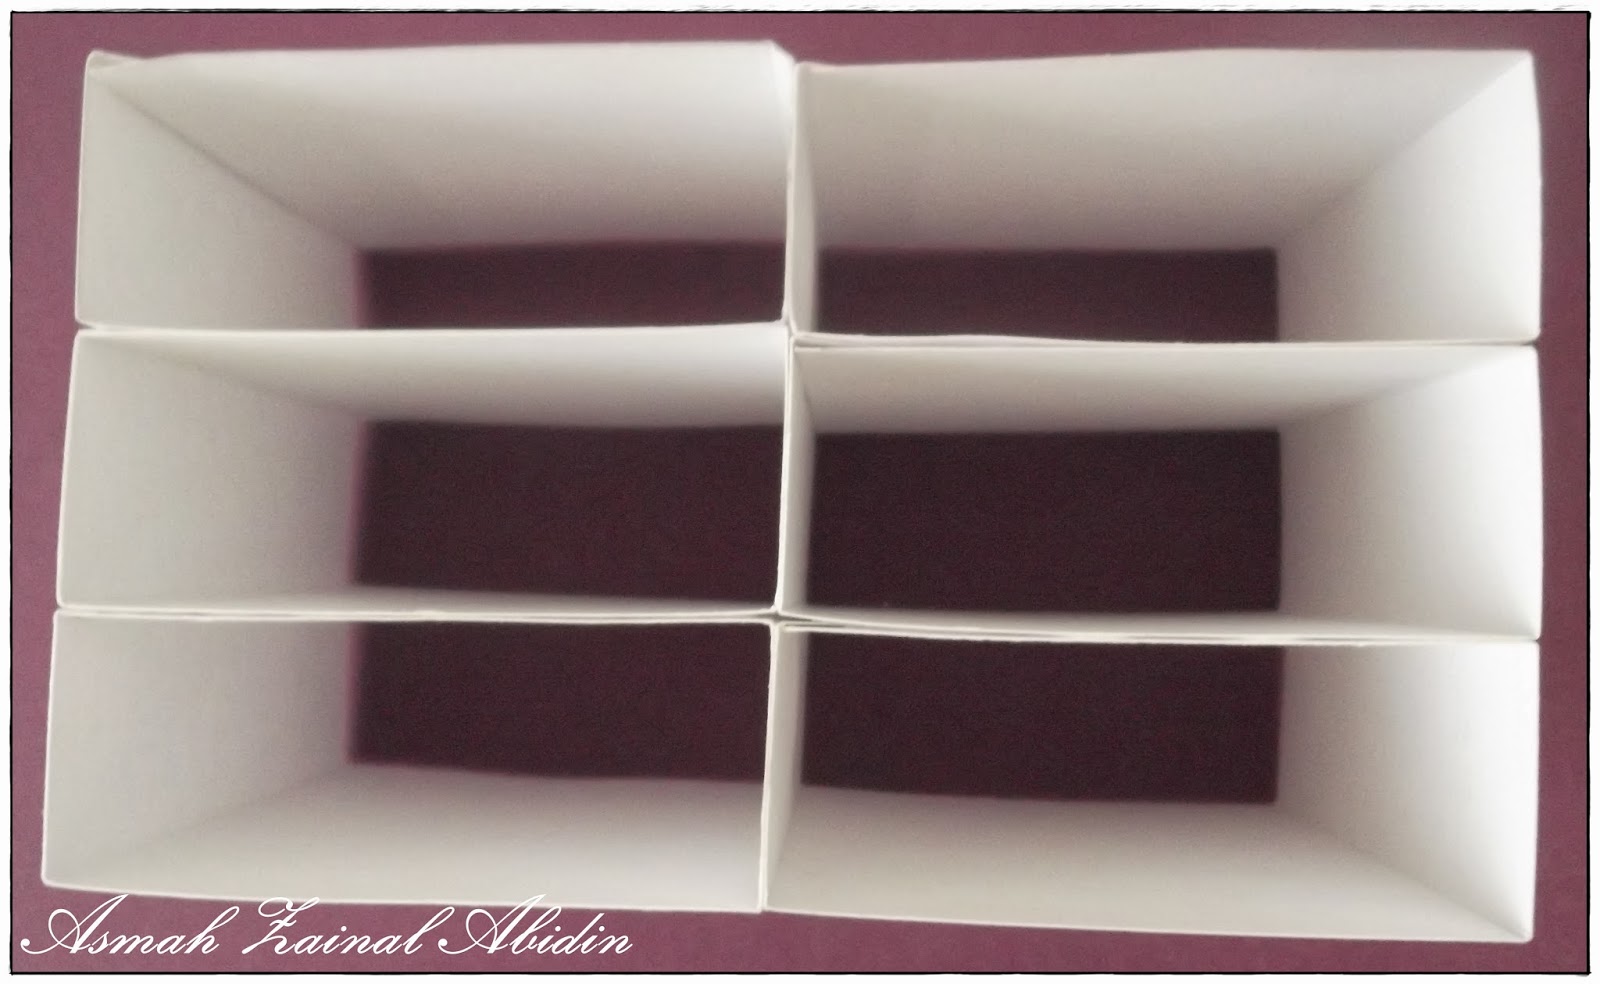
1. Six pieces of cardstock size 21x20cm for six drawers. Measure and score according to the picture above.

2. Cut according to this diagram and fold.

3. I have adhered strips of heavy duty cards from cereal box.

4. On the backside, I adorned the front of the drawer with patterned paper and sewn the bead button; you may also use a brad.

5. I adhered another piece of cereal card box and applied patterned paper in the drawer. This is optional though.

7. This is the tricky part where you must be sure to place the drawer on this cardstock for accuracy even though the measurement is given. Be sure you can easily slot the drawer in and out. Please take note that my measurement may not work for you; it really depends on the drawers you have made and you may need to adjust your own measurement to fit in your drawers even though they look all the same.

8. Adhere two cases together.

9. I have used glue on top of the cases to stack all six cases.
10. This is how it looks like after stacking them all up.

11. This is how I measure the backside for the mini dresser.

12. Cut off the four corners and adhered a piece of cereal box card. {Sorry the picture is somewhat misty; must be the rainy day that cause my poor photography, we are having monsoon season right now}

13. This is how the backside looks like...

14. And from the front side...

15. Here's my measurement for its top surface. {Sorry another blurry image; so anyway, that is 11cm [W] and 33cm [L]. Score at 9.7cm, 26cm and leave about 2cm to fold the edge like picture below}.

16. Place the mini dresser on the cardstock and adhere. Take note that I have adhered a piece of cereal box card for longevity :)

17. This is for the front view. You can do exactly like mine or decorate the top edge to your heart content. I did adhere cereal box cards before I applied patterned papers.

18. Tada...your mini dresser is ready for embellishment. I hope you find my step by step tutorial helpful. Feel free to question me in your comment if you have any doubts or email me if you like. I'm willing to answer your curiosity :-)


I would to take this keepsake into these challenges:
1. Craft My Life : Non Card creations
2. Card Mania : Anything Goes
3. Craftin Desert Divas : Anything Goes
4. Craft Your Passion : More Than 1 Fold (1/3)
5. Digi Make Over : Lots of Layers
6. Kaboodle Doodles : Tribute To A Loved One
7. Lunagirl Moonbeams : Secret & Hidden Things
8. Make It Monday : Anything Goes
9. My Craft Creations : Anything Goes (1st entry)
10. Stamp and Create : Feathers or Leaves
Until the morning after. Have a nice day.
Hugs and smiles,

Oh my Asmah, I am speechless. This is an awesome little chest of drawers, one of the most beautiful ones I have ever seen. And the cherry on the top for me is that you have done this wonderful tutorial in cm's, which me as a South African can use. So if you don't mind, I am going to give this a go xxx Thanks so much again for sharing your tutorial.
ReplyDeleteHugs
Desíre
{Doing Life – my personal blog}
Thank you for your sweet comment Desire. I am so glad the tutorial is helpful. I'm looking forward to your make. Have fun :)
DeleteGorgeous and romantic chest of drawers you have made!
ReplyDeleteThis so lovely! A beautiful creation for your little girl -- and a tutorial too! Thanks for sharing it in my Secrets & Hidden Things blog challenge at LunagirlMoonbeams.com.
ReplyDeleteLove your creation!!! Beautiful! Thank you for linking up with us for Tara's linky party at Craftin Desert Diva's We hope that you will join us again for the next linky party!
ReplyDeleteCDD DT Robin
Cut One Designs by Robin
This is absolutely stunning Asmah!!
ReplyDeleteThanks for sharing it with us at Kaboodle Doodles this week.
What a gorgeous project!!!! Stunning! Thank you so much for sharing this with us at MIM! Remember, to be in the running to win the prize from our sponsor this week just leave a comment for another entry. Be sure to mention you saw them on Make It Monday. The more entries you comment on the more chances you have of winning!
ReplyDeleteGood luck,
Rene :D
Gorgeous design and paper. Saw it from MIM. NancyD
ReplyDeletewoow Asmah this is really stunning creation wooow wooow wooow...I love this much..you are a talented woman ...great job...
ReplyDeleteI see your creation on Make it Monday and if you want to see my card is # 136 I would be so happy if you could leave me some love...many thanks before..hugs, Monika
This is STUNNING Asmah. I saw this on MIM..Loz
ReplyDeleteWow! That's a lot of work Asmah! Good for you! And what a lovely keepsake for your little girl! Beautiful job!
ReplyDeletethis is so charming! thank you for joining the challenge at lunagirl moonbeams! xo
ReplyDeletepiękna komódka, wymagała sporo pracy i serca :) bardzo mi się podoba, a tutorial przejrzysty - dziękuję :)
ReplyDeleteDzięki MIM miałam okazję Cię odwiedzić :)) Pozdrawiam serdecznie :)
A beautiful chest of drawers which your daughter will love playing with. Thank you for joining us at Craft My LIfe this challenge. Hugs Mrs A. (DT).
ReplyDeleteOH MY GOSH! Your daughter will CHERISH this forever! This project is BEYOND stuffing and it surely shows just how time consuming BUT WORTH IT that it is!!! LOVELY job!!!
ReplyDeleteThanks for joining us over at Craftin' Desert Divas!
Crafty Hugs,
Jessica
www.craftinandstampin.blogspot.com
This is lovely. My favorite part are those cute wooden handles. Thanks for sharing at Craft Your Passion. Hope to see you again.
ReplyDeleteThis is so adorable. I like the pastelcolours you used and the little butterfly.
ReplyDeleteIt is lovely.
Thanks for joining us at Craft your Passion.
xxx Michelle
Hi Asmah
ReplyDeletesorry for my absence but I've had difficulty leaving comments,my technology at fault I think. This is absolutely stunning. Im sure your daughter will treasure it always. Amazing tutorial too.
Best wishes
Ang x
Gorgeous project, thank you for joining the my craft creations challenge, good luck x
ReplyDeleteAdorable box! Love the pastel colors!
ReplyDeleteThank you for sharing it with us at Card Mania Challenge!
Smiles, Kaly
Classic!
ReplyDeletePopped over from Mrs Ducks blog and boy! Am I glad I did.
ReplyDeleteI love, love, love this little chest of drawers. Have bookmarked this in hope that I get time to have go at making it.
Thank you for the wonderful Tutorial
Patricia
It's sooo lovely sis...!~ ♥♥♥
ReplyDeletemagnifique merci pour le tuto
ReplyDelete